Raised Bed Gardening Part 2: Garden Location & Setup

This post may contain affiliate links. As an Amazon Associate, I earn from qualifying purchases at no additional cost to you. I only share products I truly love or would use in my own home.
🌿 Helpful Garden Tools & Supplies I Use
Before we get started, I wanted to share a few of the tools and supplies I personally use (or very similar ones) when planning and setting up my garden.
(This section contains affiliate links. As an Amazon Associate, I earn from qualifying purchases at no additional cost to you.)
None of these are required to get started — you can absolutely begin with what you have. But having a few reliable tools on hand can make the process easier, more enjoyable, and a lot less overwhelming.
I’ve found having these on hand makes each step feel much more manageable — especially when you’re just getting started.
Here are a few of my go-to gardening essentials:
🌱 Basic Garden Tools
- Hand trowel and tools
- Garden gloves
- Pruning shears
- Watering can or hose wand
🪵 Raised Bed & Setup Essentials
- Corrugated raised garden beds — these are the raised beds I use in my own garden
- Landscape fabric or weed barrier
- Garden stakes or markers
- Twine or plant ties
🌿 Soil & Planting Supplies
- High-quality garden soil
- Compost or soil amendment
- Seed starting trays (with lids if using indoors)
- Grow lights (for early seed starting)
💧 Watering & Maintenance
- Soaker hose or drip irrigation
- Mulch (straw, wood chips, etc.) — Local home supply stores often run great sales on mulch early in the planting season.
- Garden kneeler or seat
💡 Having these simple items nearby can make each step — from planning to planting — feel much more manageable and enjoyable along the way.
Choosing the Right Location & Setting Up Your Garden
By now, you’ve planned what you want to grow and started your seeds indoors. That exciting “waiting period” has begun — and while those seedlings are growing, it’s the perfect time to prepare your outdoor garden space.
In this post, we’ll focus on choosing the best location, setting up raised bed vegetable gardens, preparing soil, installing watering systems, and getting everything ready for planting day.
This step-by-step setup now will save you time, stress, and frustration later in the season.
☀️ Step 1: Choose the Perfect Garden Location
One of the most important decisions you’ll make is where your garden will live.
Most vegetables need 6–8 hours of direct sunlight per day to grow and produce well. Some plants can tolerate partial shade, but most thrive in full sun.
Sun patterns also shift slightly as the seasons change. As summer approaches and the sun rises higher in the sky, some areas of your yard may receive more light — while others may gain shade from trees or nearby structures.
If possible, observe your chosen garden spot at different times of day and across a few weeks in spring to be sure it receives consistent sunlight.
When choosing a location, look for:
- A spot that receives consistent sunlight
- An area that drains well (no standing water after rain)
- A place close to a water source, if possible
The south-facing side of your yard usually receives the strongest and most consistent sun. It can also be warmer, which is great in spring — just be mindful during very hot summers.
Good sunlight = stronger plants and better harvests.
🌿 Why I Prefer Raised Beds
As I mentioned in Part 1 of this series, I’m a big fan of raised beds.
While you can rototill ground soil and improve it with compost and amendments, raised beds offer several advantages:
- Soil warms faster in spring
- You control soil quality and drainage
- No deep digging required
- Fewer weed and pest problems
- Easier on your back and knees
Without a barrier underneath, ground gardens are more vulnerable to critters tunneling up and damaging roots. Raised beds help reduce that risk.
And if you ever run out of room? You can always add large pots or containers for overflow plants.
🛠️ Step 2: Purchase or Build Your Raised Beds
Once you know where your garden will go, it’s time to choose your beds.
The most common and beginner-friendly size is 4′ x 8′. This width allows you to easily reach the center without stepping on the soil and compacting it.
You can:
- Purchase ready-to-assemble galvanized beds
- Build your own using untreated wood (like cedar)
- Repurpose sturdy containers
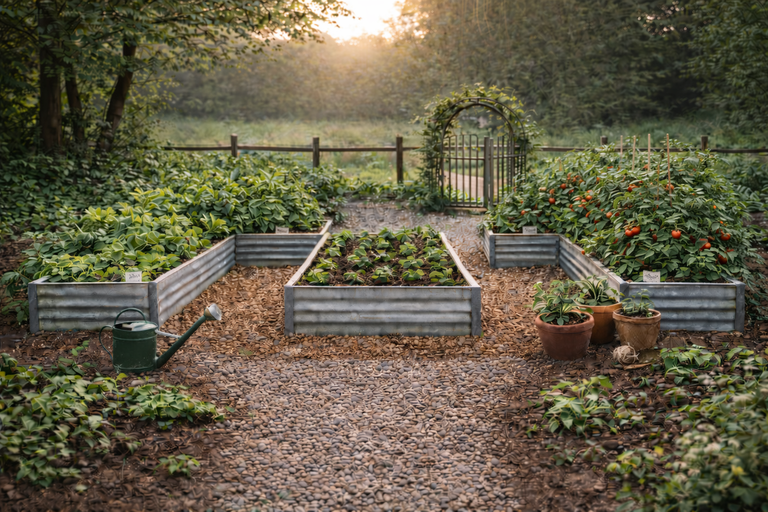
I use corrugated galvanized beds arranged in a U-shape with a center “island” bed and crushed stone walkways. This layout keeps everything accessible and organized.
Choose the number and size of beds based on:
- Your available space
- How many plants you plan to grow
- How much time you want to commit
Start small. You can always expand later.
🌱 Step 3: Prepare the Foundation
Before assembling your beds, take time to prepare the ground underneath.
Here’s my method:
- Lay landscape fabric to block weeds
- Assemble beds on top
- Add wire mesh at the bottom to prevent tunneling pests
Inside the beds, layer:
- Newspaper or cardboard
- Small sticks or yard debris
This reduces soil costs and improves drainage while keeping the soil lighter and easier for roots to grow through.
🌾 Step 4: Fill with Quality Soil
Healthy soil creates healthy plants.
I use a mix of:
- Topsoil
- Compost
- Perlite and/or vermiculite
Perlite improves drainage.
Vermiculite helps retain moisture.
Both are valuable for strong root development.
If mixing feels overwhelming, pre-blended raised bed soil works well too.
Think of soil as an investment — it pays you back all season long.
💧 Step 5: Install Soaker Hoses & Mulch
Watering correctly is one of the biggest keys to success.
I strongly recommend using soaker hoses in raised beds. They:
- Deliver water directly to roots
- Reduce evaporation
- Prevent wet leaves (which can cause disease)
Lay hoses in a zigzag or curved pattern across each bed. Once in place, cover with 1–2 inches of mulch.
Mulch helps:
- Retain moisture
- Prevent weeds
- Regulate soil temperature
Using a hose timer makes watering effortless. Many include rain-delay features, which save water and prevent overwatering.
Set it and forget it.
🌿 Step 6: Square Foot Gardening & Containers
I use square foot gardening — dividing each bed into 12″ x 12″ sections.
Each square holds one plant (or several small ones, depending on type).
When beds fill up, I add:
- Large plastic pots
- Fabric potato bags
Potato bags are especially helpful and make harvesting easy.
Keep in mind:
- Containers dry out faster
- Dark pots absorb more heat
- They need more frequent watering
Avoid overcrowding. Follow the same spacing rules as in raised beds.
Some deep-rooted plants still prefer in-ground beds, so use containers wisely.
🌱 Step 7: Hardening Off Seedlings
Before planting indoor-started seedlings outside, they must be hardened off.
This usually begins 7–14 days before your last frost date.
Hardening off helps plants adjust to:
- Sun
- Wind
- Temperature changes
Start by:
- Placing seedlings outside in a sheltered area
- Increasing time outdoors each day
- Bringing them inside at night at first
Small portable greenhouses are extremely helpful during this stage.
This process prevents transplant shock and protects your hard work.

🌼Companion Planting: Growing Smarter Together
As you begin placing plants into your raised beds, it’s helpful to think about which vegetables grow well together.
This is called companion planting — pairing plants that support each other through pest control, pollination, or improved growth.
For example:
- Tomatoes grow well with basil and marigolds
- Carrots pair nicely with onions
- Lettuce benefits from partial shade provided by taller plants
- Peas and beans can naturally enrich soil with nitrogen
Some combinations help deter pests, while others simply make better use of space.
If you’d like a simple reference guide, the Old Farmer’s Almanac offers an easy-to-read companion planting chart that can help you plan your layout with confidence.
Companion planting isn’t about being perfect — it’s just another thoughtful way to give your garden a little extra support.
🌼 Step 8: Planting Day
Once beds are ready and plants are hardened off, it’s time to plant.
Follow your garden layout map.
When planting:
- Move mulch aside
- Dig holes near soaker hoses
- Place plants carefully
- Refill soil
- Replace mulch, keeping it 1–3 inches away from stems
This spacing allows air circulation and prevents rot and disease.
💚 The Waiting Game
After everything is planted and mulched… you wait.
This is honestly the hardest part for me.
I check my garden every day — watching for sprouts, flowers, and fruit. I love seeing how much changes in just 24 hours.
These are my “baby plants,” and caring for them brings me so much joy.
🌿 Looking Ahead to Maintenance
Proper maintenance is what turns a good garden into a great one.
Watering, fertilizing, pest management, and pruning all play a role in producing abundant harvests.
We’ll cover all of that in Part 3 of this series.
🌸 Final Thoughts
Setting up your garden takes time and effort — but it’s worth every minute.
With thoughtful planning, good soil, steady watering, and patience, you’re creating a space that will feed both your body and your soul.
It doesn’t have to be perfect.
It just has to be yours.
🌱 What’s Coming Next
In Part 3, we’ll dive into:
- Watering routines
- Fertilizing schedules
- Pest control
- Supporting plants
- Ongoing care
Everything you need to keep your garden thriving all season long.
If you’re new here, you can learn more on my About page.